Using the Valthrun EFI loader
The Valthrun EFI Loader is the most secure and easiest method for mapping the Valthrun Kernel Driver. It automatically injects the Valthrun Kernel Driver into the Windows kernel during system startup by interfacing with the Windows loading process at the UEFI level. This approach ensures seamless integration of the driver into the kernel, preventing other drivers from observing the loading process and eliminating the need for any manual intervention.
To map the Valthrun Kernel Driver with the Valthrun EFI loader, follow these steps.
Ensure that any software scanning for system integrity at the kernel level (e.g., anti viruses, kernel anticheats) is disabled before proceeding! The Valthrun Kernel Driver will load regardless of these other drivers, which may lead to it being flagged. For more information, please read here.
Initial setup
Creating a USB stick containing the Valthrun EFI loader is a quite straight forward but yet complex process.
Please follow each step closely to avoid any issues.
Step 1: Obtain the bootloader
In this step, we'll download the latest Valthrun EFI loader from the Valthrun Homepage.
- Visit the Valthrun Downloads page.
- Download the latest Kernel Driver UEFI loader.
- Extract the ISO file from the downloaded ZIP file.
Step 2: Creating bootable flash drive
After downloading the Valthrun EFI loader from GitHub we will need to create a bootable USB flash drive. We'll use the Rufus utility to burn the previously obtained ISO to a USB drive.
-
Download Rufus
Download Rufus from the official Rufus website. -
Prepare a flash drive
Ensure you have a flash drive that is not currently in use, as all data on it will be wiped.
Insert the flash drive into your computer. -
Launch Rufus
Open the previously downloaded Rufus application. -
Configure Rufus
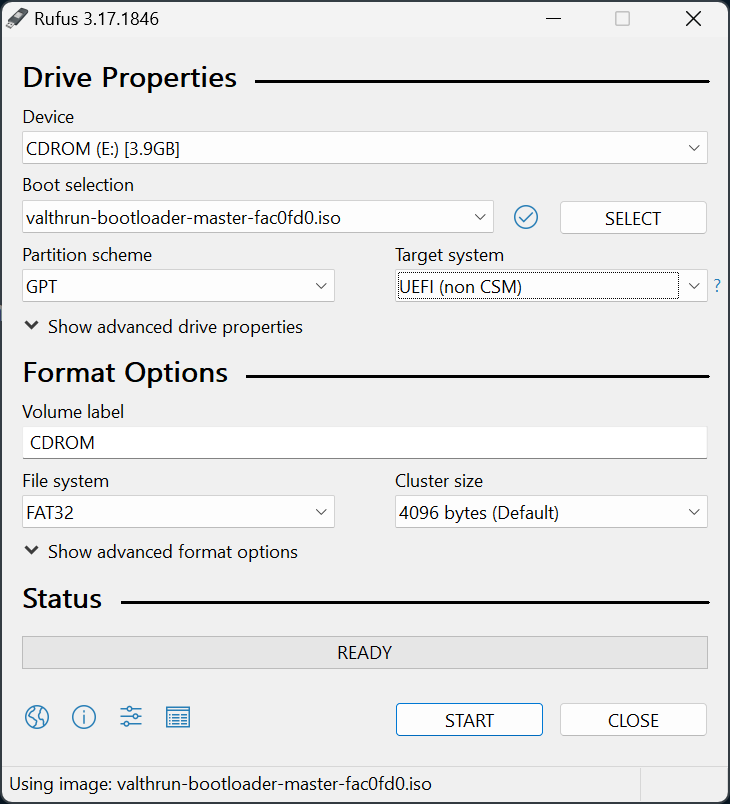
We need to adjust some of the following settings:- Device Selection: Your USB stick
Select your flash drive from the list of devices. - Boot Selection: Valthrun EFI loader path
Click on the "SELECT" button to choose the extracted ISO image. - Partition Scheme:
GPT - File System:
FAT32
- Device Selection: Your USB stick
If done everything correctly, Rufus should look like this:

- Create your Valthrun EFI loader USB stick
Click on the "START" button in Rufus to create your bootable flash drive.
Please wait until the process is completed.
Step 3: Boot from your flash drive
After creating our bootable flash driver with the Valthrun EFI loader we need to boot from it. You'll need to do this every time you want to load Valthrun when starting your PC.
-
Restart your PC
Once the bootable flash drive is ready, restart your computer. -
Enter the boot menu
During the boot process, access the boot menu by pressing the appropriate key for your motherboard (commonly F12, F10, or Esc). -
Select the Flash Drive
In the boot menu, select your flash drive as the boot device.
After selecting the flash drive, you'll boot using the Valthrun EFI loader.
Step 4: Enroll hash (only when secure boot is activated)
If you have secure boot disabled, you have to skip this step!
Once you've completed the steps above and you successfully booted from your freshly burned Valthrun EFI loader USB stick you should see the following.
-
Enroll the loader hash
To enroll the hash of the loader fistly select in the main menuEnroll Hashand pressENTER. You'll then be prompted which binaries hash you want to enroll. Use your arrow keys to selectloader.efi. PressENTERto select the file. You'll be prompted if you want to enroll the hash into the MOK database. Confirm this by selectingyesand pressENTER. -
Reboot system Once enrolled, you can select the
Reboot Systemoption from the main menu to reboot the system.
Attention: You may have to again select the Valthrun EFI loader within the boot menu (see step 3)
Show image guide
Step 5: Verify Valthrun has been loaded
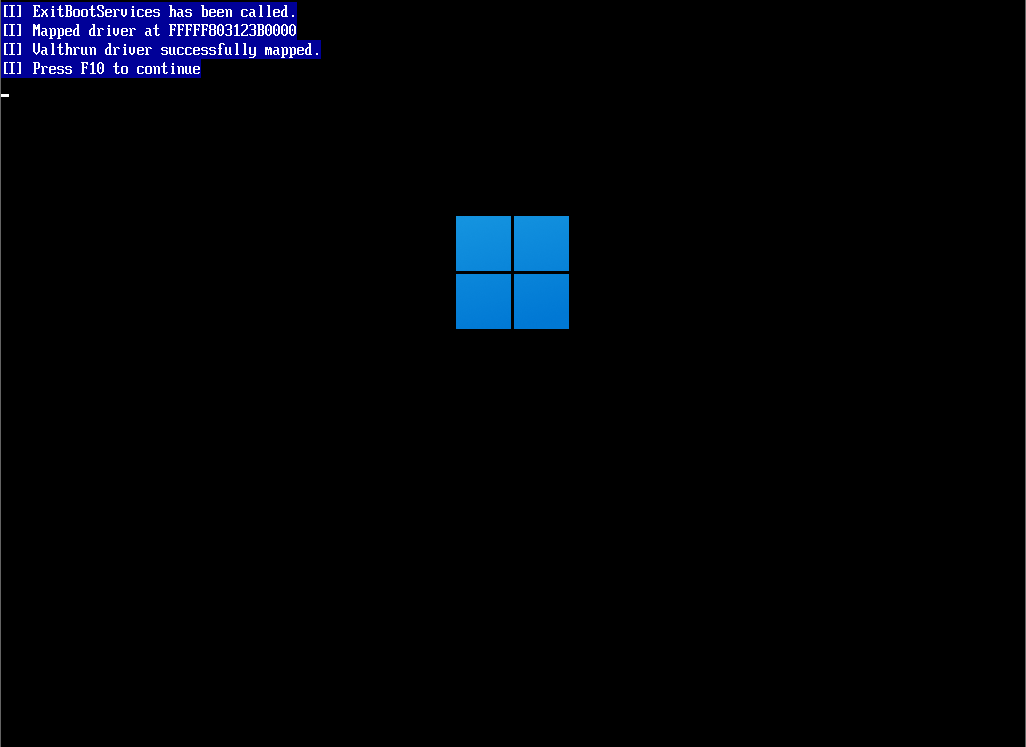
If you managed to successfully load Valthrun via the efi, you should see the following screen.
Press F10 to normally boot Windows. The Valthrun kernel driver will be loaded as soon as Windows boots up.

Pro Tip:
You may remove the USB stick before pressing F10 to improve stealhness.
From this step onwards you do not need the USB drive untill next system start.
Mapping Valthrun again after reboot
With every system shutdown the Valthrun Kernel Driver will be unloaded.
You'll have to boot via the Valthrun EFI loader to load the Valthrun Kernel Driver on system start.
You can ether do this by selecting the Valthrun EFI loader manually every time (see step 3) or change the boot order of your system.
Additional info
EFI loader with kernel based integrity checkers
Ensure software which scans for system integrity on a kernel based level (e.g. kernel anticheats) are disabled before proceeding!
Failing to do so may result in such software "flagging" your system.
The publically available Valthrun Kernel Driver is not designed to be stealhy!
Some such driver vendors might block unsigned drivers for security reasons.
By using this EFI loader the Valthrun Kernel Driver will be loaded with highest priority before any other installed driver.